|
A critical review
of the
Secure & Steady Dowsing Rod Prototype |
|
|
I was fortunate enough to
have Kenny find time to look at, handle and test the early prototype of
the dowsing rod rig. I sent him parts for him to assemble the rig using
his own rods he has in his possession. Kenny has the gift of
critical thinking no matter how hard you try to make him not do it!
I thank him for his honest and detailed feedback much of which is
incorporated into the current version of the rig. |
|
|
|
Kenny Biddle
December 29, 2009 at 6:26pm |
|
|
|
Dowsing Rod Device Testing (Round One)
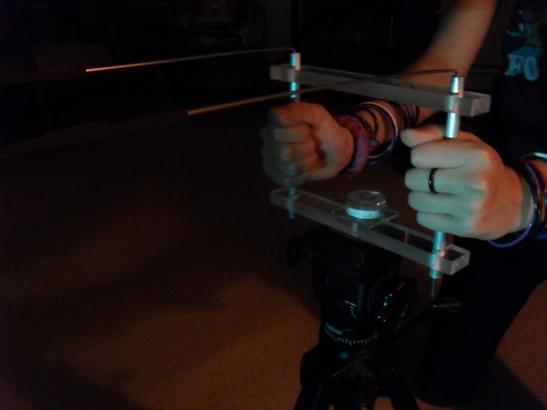
Device
Two resin blocks measuring approximately 7 ¾ inches (long) by 1 inch
(wide) by ½ inch (height). One block has a circular bubble level mounted
to it, and can be used as the top or bottom block. Both blocks have three
holes; two are for mounting to the handles of a pair of Dowsing Rods,
which are equipped with Helicoils to snug up to the handles. The third
hole (located in the center) is for mounting the device on a tripod. A
smaller “spacer” block was included in my kit in order to aid in the
assembly of the device. |
|
|
|
Assembly
Initial assembling the device took all of five minutes, though I took a
bit longer by adjusting here and there, and modifying the technique. To
assemble, you take a standard pair of dowsing rods and separate the
handles from the actual rods. Next, you place a resin block on top of the
smaller spacer…which should be resting on a flat surface. Feed the dowsing
rod handles through the open holes until the rest of the flat surface.
Snug up the screws until they hold the handles tightly. Repeat this with
the 2nd block on the other end of the handles. Once both ends are secure,
simply slide the dowsing rods into the handles. You’re ready to go.
Assembly Feedback
Over all, it is a simple, yet brilliant design. I really only had two
issues with assembly.
1 - The spacer block was even on one side, but the surface of the shorter
side was cut unevenly, making the large blocks wobble. This was due to
both the small size of the spacer and the uneven flat side.
2 - Another issue came from the Spacer – the height. With my hands, I
could not get my whole hand wrapped around the handle when I used the
Spacer block. I ended up using a slim CD case, which worked out much
better. It fit nicely between the holes for the rod handles, and was long
enough to keep the block level and steady. I was also able to wrap my
whole hand around the handles this way.
3 – The screws for securing the rod handles was nice, but I was constantly
worried that I was going to over tighten the screws and strip out the
threads in the blocks. I would suggest putting an insert in there, to give
it a bit more strength. I’m worried that you’d get a lot of people
stripping them out quickly (because we both know there are people out
there that have no clue).
4 – Spacing of the rods is good for a person with a small to medium size
build. I found that the 6 ¼ inch spacing of the handles to be a little
tight. It’s something I could get used to…though I personally wouldn’t be
using it “in hand” much at all (I prefer the tripod method). |
|
|
|
Free
Hand Use
Using the Dowsing Rods in this device is almost exactly like anyone else
uses them all the time. You hold the rods, by the handles, in both hands.
The user can perform the “Dowsing” however they normally do; asking
questions, walking around, standing or sitting still. However, the bubble
level will show if the device is deliberately tipping one way or another.
As long as there is another witness (preferably a video camera) watching
the user and the level, “tipping” should be nullified. |
|
|
|
Free
Hand Feedback
1 - It took a little adjusting to make sure I got the bubble in the bubble
level to be centered, but once I did…it was perfect. Any titling of the
rods, and thus the device, cause an obvious movement of the bubble.
2 – By securing the handles into the blocks, the device effectively
eliminated any independent movement of the rods. They MUST move in sync
with each other. Although, with a lot of practice, some skill, and some
obvious intention…I was able to get the rods to move in opposite
directions. However, it was clear that this was my intention, and not the
work of spirit energy. In addition, the bubble simply danced all over the
level like a Mexican Jumping Bean.
3 – I also found that having the rods as part of this “larger” device
(assembled, it looks bigger than its actual parts), the slight movements
used by dowsers to manipulate the rods are now amplified. In plain
English, the slight movements are now more obvious. Instead of having to
watch two hands that were independent of each other, and also kept the
majority of the handle hidden…we now have two almost 8 inch blocks, with a
distance of 4 ¾ inches between them, transferring the slight tipping into
an obvious tilt.
4 – The Bubble Level is really the key to this device. Any movement that
would have been considered “slight” and possibly overlooked, now causes
the bubble to move significantly – from a ¼ to ½ an inch. When compare to
the overall possible movement of the bubble, 1 1/8 inches, which is a big
and noticeable movement.
|
|
Tripod Mounted Use
As mentioned, on the bottom of each block, there is a threaded hole for
use with a tripod. Simply attach the tripod mount to the block, and lock
the device into place. This allows a user to set the tripod to get the
level perfectly in the center. The Dowsing Rods can now be used
independent of a user. However, if a user insists that human contact is
needed, they are still free to hold the handles. If the Dowsing Rods are
truly manipulated by spirits, then allowing them to stand alone is the
only way to take the human element out of the equation.
Tripod Mounted Use Feedback
1 – Setting the entire device on a tripod, leveling it, then not touching
it is the only method that should be used when testing/using Dowsing Rods.
It took a matter of minutes to set up, and setting up a video camera to
cover it would only take a few minutes more.
2 – I set the device up in two locations, on a tripod. In both locations,
the device sat for three days. Each time a I passed the device, I would
ask at least one question…up to five. I would also repeat the directions
to any spirits that wanted to participate; “Please answer YES by crossing
the rods. Please answer NO by splitting the rods farther apart”. I would
then demonstrate what I wanted to see. I added that they could take a few
minutes to answer. At no time did the rods move at all. |
|
|
|
Conclusion
I have to say it again; this is a simple, yet brilliant design. I see this
as something that avid users will steer clear of…and probably attack. Why?
Because it allows anyone to openly “see” the manipulations of the rods
(tilting, tipping) AND prohibits the independent manipulation of the
individual rods. This effectively renders their claims “debunked” and the
rods useless.
The only addition I would want to install would be a small spy cam, with
audio, on the under side of the top block. This would give a view of the
bubble level, as well as an audio track of what’s going on. I can see
users walking off, away from viewers, and only then getting a “hit”.
Other than the small issues I covered above, I love this device and plan
on taking it on several investigations…just to pile up the data. I would
also like, with permission, to present this as a test for those who
continue to claim that Dowsing Rods still work. I believe you should have
a complete write up done and sent in to publications such as Skeptic
Magazine, Skeptical Briefs and other publications. |
|
|
|
Kenneth
Biddle
Paranormal Investigators & Research Association
Return
to
nyackparanormal.com |